A lush, green lawn is the pride of any homeowner. It transforms bare soil into a vibrant space for family gatherings, play, and relaxation. While growing grass from seed is an option, many choose turf for its instant results and reliability. This comprehensive guide covers everything you need to know about successful turf installation, from timing your project to long-term maintenance.
Why Choose Turf Over Seeding?
Turf offers immediate aesthetic appeal and functional benefits. Once laid, it provides instant erosion control, suppresses weeds, and creates a usable surface much faster than seed. High-quality turf is grown under professional conditions, ensuring dense, healthy grass with strong root systems. It also performs better in challenging conditions where seed might struggle to establish.
However, success depends heavily on proper planning and execution. Poor preparation or incorrect timing can lead to disappointing results, including patchy growth, weeds, or even complete failure.
When to Lay Turf
When to lay turf is one of the most critical decisions for achieving a thriving lawn. Timing affects root establishment, moisture retention, and overall success rate.
The best periods are during the cooler, moist seasons of spring and autumn. In spring, aim for March to May when soil temperatures rise above 8–10°C (46–50°F) and rainfall is consistent. This allows roots to establish before the heat of summer. Autumn (September to November) is often ideal because cooler temperatures reduce evaporation stress, and natural rainfall helps the turf settle without excessive watering.
Avoid laying turf in the height of summer (June to August in many regions) unless you can commit to intensive daily watering. Extreme heat causes the turf to dry out rapidly, leading to shrinkage, yellowing, or death before roots take hold. Similarly, steer clear of winter months when the ground is frozen or waterlogged, as this prevents proper root penetration and increases the risk of disease.
Consider your local climate and soil type. In milder coastal areas, you may have more flexibility, while inland or northern regions require stricter adherence to seasonal windows. Always check the weather forecast for at least a week of mild, overcast conditions following installation.
Preparing the Ground: The Foundation of Success
Excellent preparation is non-negotiable. Turf is like a carpet — it needs a smooth, stable, and nutrient-rich base to perform well.
Start by clearing the area of all existing vegetation, debris, and large stones. Remove old grass, weeds, and roots thoroughly. This can be done manually with a spade or using a turf cutter for larger areas. Persistent perennial weeds like dandelions or bindweed should be treated with an appropriate systemic weedkiller several weeks in advance, allowing time for the chemical to work without harming the new turf.
Next, improve the soil structure. Test your soil pH — most grasses prefer slightly acidic to neutral conditions (pH 6.0–7.0). If your soil is heavy clay, incorporate sharp sand or grit to improve drainage. For sandy soils, add organic matter like well-rotted compost or topsoil to enhance water and nutrient retention. Aim for a minimum 10–15 cm (4–6 inches) depth of good quality topsoil.
Level the ground meticulously. Use a rake and roller to create a firm, even surface with a slight slope (about 1 in 80) for drainage away from buildings. Compact the soil in layers to prevent future sinking, but avoid over-compaction that could hinder root growth. The final surface should sit about 2–3 cm (1 inch) below surrounding paving or edging to allow for the turf thickness.
Apply a balanced pre-turfing fertiliser high in phosphorus to encourage strong root development. Rake it lightly into the surface.
Turf Laying Installation: Step-by-Step Process
Turf laying installation requires careful technique to ensure seamless coverage and rapid rooting. With the right approach, you can achieve professional-looking results.
Begin by ordering your turf from a reputable supplier. Specify the grass type suited to your needs — for example, hard-wearing mixtures for family lawns or finer varieties for ornamental areas. Arrange delivery for the day you plan to lay it, as turf deteriorates quickly if left rolled up in plastic for more than 24–48 hours, especially in warm weather.
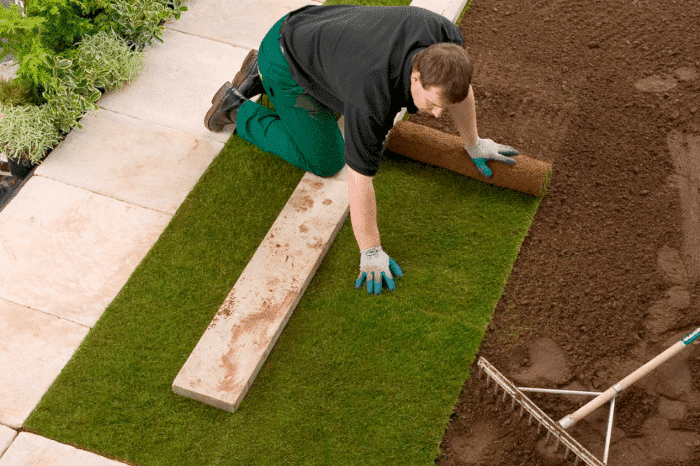
Lay the turf in a staggered brickwork pattern, starting from a straight edge such as a path or string line. This prevents visible seams and promotes even growth. Place each roll tightly against its neighbour without overlapping or stretching. Use a sharp knife or half-moon edger to cut pieces to fit around obstacles like flower beds, trees, or manhole covers.
Work backwards across the area to avoid walking on newly laid turf. If working on a slope, lay the rolls across the slope rather than down it to prevent slippage. For larger areas, use planks to distribute your weight evenly while working.
Once laid, tamp the turf down firmly using the back of a rake or a turfing board to ensure good soil contact and eliminate air pockets. This step is crucial for root establishment. Brush a light top-dressing of sharp sand or soil mix into the joints to help retain moisture and fill any small gaps.
Watering and Initial Aftercare
Watering is the most important post-installation task. The turf must not be allowed to dry out during the first few weeks. Water deeply and thoroughly immediately after laying, aiming for about 2–3 cm (1 inch) of water per session. The soil beneath should be moist to a depth of 10 cm (4 inches). In hot or windy conditions, you may need to water twice daily.
Avoid overwatering, which can lead to fungal diseases or shallow rooting. As roots establish (usually within 2–4 weeks), reduce frequency but increase depth to encourage downward growth.
Do not walk on the new lawn for at least 3–4 weeks, or longer in poor weather. Light mowing can begin once the grass reaches 5–6 cm (2 inches) in height, removing no more than one-third of the blade at a time. Use a sharp mower and avoid heavy equipment until the turf is firmly rooted.
Apply a balanced lawn fertiliser after 4–6 weeks to support healthy growth. Keep the area free of weeds by hand-pulling any that appear, as chemical weedkillers should generally be avoided on new turf for the first season.
Common Mistakes to Avoid
Many turf failures stem from preventable errors. Ordering too much or too little turf leads to waste or delays. Laying on unprepared or uneven ground causes poor establishment and visible bumps. Insufficient watering in the critical early period is the top cause of failure, while laying during extreme weather dramatically reduces success rates.
Using low-quality or incompatible grass types can result in ongoing maintenance headaches. For example, a shade-tolerant variety performs poorly in full sun, and vice versa. Failing to remove all old vegetation and roots invites aggressive weeds to compete with your new lawn.
Long-Term Lawn Maintenance
A well-laid turf lawn can last for decades with proper care. Maintain regular mowing at the correct height for your grass type — typically 2.5–4 cm (1–1.5 inches) for most domestic lawns. Scarify annually to remove thatch, aerate compacted areas, and top-dress with compost or sand to improve soil structure.
Monitor for pests and diseases. Common issues include leatherjackets, chafer grubs, moss, and fungal patches. Address problems promptly with appropriate cultural or targeted treatments rather than blanket chemical applications.
Overseed thin areas each autumn and adjust fertiliser programs based on soil tests. With consistent care, your lawn will remain dense, resilient, and beautiful year after year.
Conclusion: Investing in Your Outdoor Space
Creating a perfect lawn through turf laying installation is a rewarding project that adds significant value and enjoyment to your property. By choosing the right time — understanding When to lay turf — preparing the ground thoroughly, and following proper installation techniques, you set the foundation for success.
Patience during the establishment phase pays dividends. Within a few months, you’ll have a lawn that looks as though it has been there for years. Whether you tackle the project yourself or hire professionals, the principles remain the same: quality materials, meticulous preparation, and attentive aftercare.
Your new lawn awaits. With the knowledge from this guide, you’re well-equipped to achieve outstanding results that will enhance your home for many seasons to come.